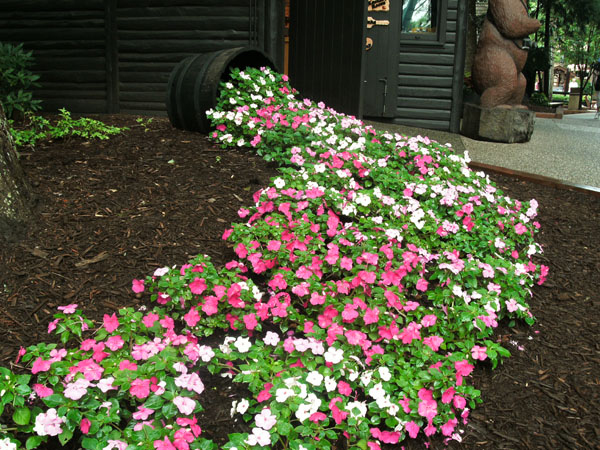
Bush Gardens Europe via "The Bebes"
I love this variation on the spilled bucket or wheelbarrow of flowers. The tiny impatiens flow from the bucket creating a stream of color. This project is simple enough to accomplish, but it will take tons of impatiens to get the job done.
You don't need to use impatiens, of course, but their mounding growth habit and ability to thrive in low light make them ideal for brightening a shady nook. For a sunny location, try cascading petunias instead. How it's done
White or multicolored alyssum or blue lobelia would also make an attractive stream of color. They both thrive in full to partial sun and are easy to care for. Until Next Time . . . HAPPY GARDENING!
0 Comments
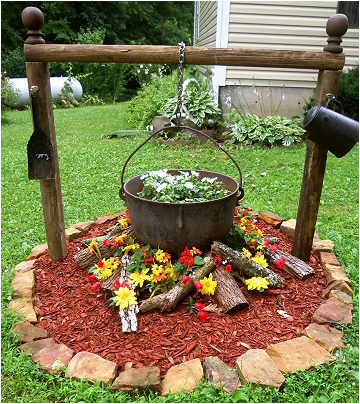
I'd love to be able to credit the original photographer and/or gardener for this image, but I'm afraid that will remain unknown for now. I found this striking faux fire under a boiling pot of posies on Pinterest, but the link to the original is blocked due to potential problems with that site. If you know who the photo belongs to, please drop me a line.
This one is self-explanatory. The cauldron is filled with a plant pot with white flowers to resemble bubbles. I'm not sure what kind of flowers are in this pot, but I'd add sweet alyssum to the pot to give it the illusion it is boiling over. The real charm here lies in the surrounding the pot with sticks of firewood and then planting yellow and red flowers to simulate flames. The petals of the yellow daisies add a nice touch. I'm not sure what the red flowers are, but they look like red nicotiana to me. You could also use dwarf red petunias. Dwarf cosmos in shades of red, orange and yellow or dwarf marigolds are also good options for achieving the simulated fire. Until Next Time . . . HAPPY GARDENING! 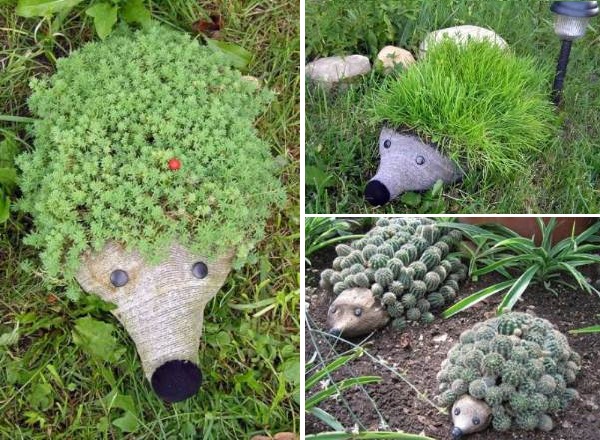 These cute little hedgehogs will look right at home in your garden and they are so easy to make that you will be amazed. The body is made from a recycled two-liter soda bottle that has been cut to accommodate the plants, while the face is nothing more than a little jute or decorative fabric wrapped around the mouth of the bottle. Cover the cap with felt and add buttons or black stones for eyes and fill the planter with a prickly plant.
They look adorable with cacti or succulents, but dwarf ornamental grass would work, too. Some options for plants include:
For full instructions for making the hedgehog planter, visit Susie Qute. This is a great garden project to do with kids or to satisfy the garden bug in you this winter while the snow is still piled up outside. I'm thinking of trying one with cat grass. Although my cat might not appreciate the cute little hedgehog, I'm sure she won't turn away a nibble of fresh grass. Until Next Time . . . HAPPY GARDENING! 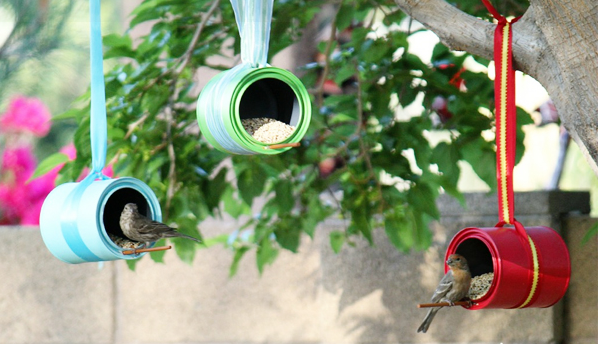 I wanted to share these whimsical little bird feeders from recycled cans with you this morning. These were made by Sara at Mom Endeavors. Please visit her site for complete instructions and a supply list.
These make a delightful project for kids to make for Mom on Mother's Day or as a special gift for Grandmom, but are right at home in any garden. Go ahead and get creative and add color to your backyard or garden. Until Next Time . . . HAPPY GARDENING! 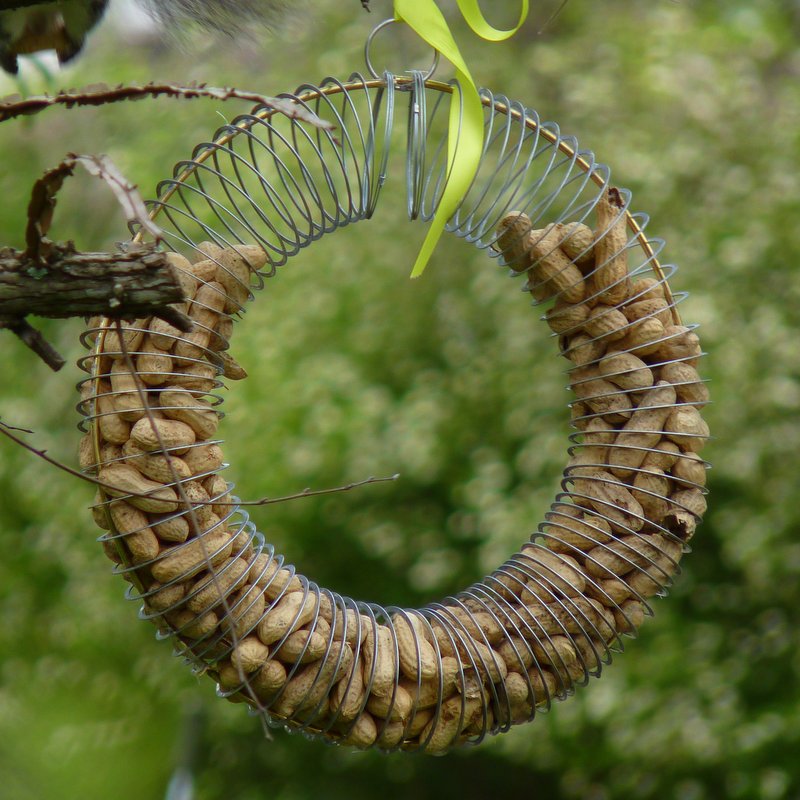 By Jill Staake via Birds & Blooms You've probably seen these cute little peanut feeders sold online. You may have even wondered if you could make one yourself. As it turns out, you can and it's much easier than you may think! While some claim to make them with a coat hanger and a slinky, Jill Staake went a step further and used a wreath ring to give the feeder more stability and to improve the appearance. We think hers turned out every bit as attractive as those available for sale.
You will need a metal slinky, of course, as squirrels will eagerly chomp through the new plastic slinkies. The good news is you can purchase a regular size slinky for under $5 to make this delightful peanut feeder. According to the Cornell Lab of Ornithology peanuts in the shell attract cardinals, blue jays, and squirrels.
You can find the complete instructions for making this slinky peanut feeder at Birds & Blooms.  You've probably seen the images of spiral fairy gardens made from a broken plant pot. If you are like most of us, you probably added it to your list of projects, but secretly worried that you couldn't duplicate it. This easy DIY project creates a similar container garden and is so easy to make that the proverbial caveman can do it.
This image comes to us from User Name curlyzoitsa on Indulgy. While there are no instructions included, the images should be easy to follow. Add a miniature fairy house at the top and line the spiral with herbs, like wooly thyme, or miniature plants. Look for alpine plants or succulents to brighten your spiral fairy garden. Until Next Time . . . HAPPY GARDENING! 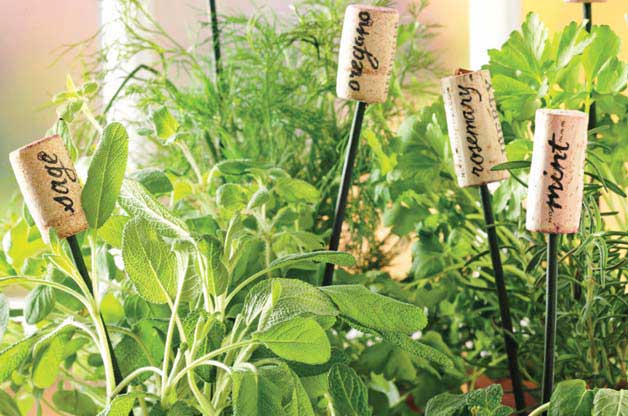
Wine Cork Plant Markers via Birds & Blooms
These adorable little plant markers are just right for the herb garden and let you identify your herbs in style. They are made from ordinary wine corks (you can buy them in your local craft store) labeled with a permanent marker. You can use garden stakes or bamboo for the stakes.
Metal orchid stakes (available online) can be painted black and used as the stake to give the illusion of wrought iron. But you aren't limited to commercial products. Go ahead and trim twigs from your yard and top them with these wine cork plant labels to add a touch of class to your garden. VisitBirds & Blooms for more instructions for making these wine cork plant labels. Until next time ... HAPPY GARDENING! 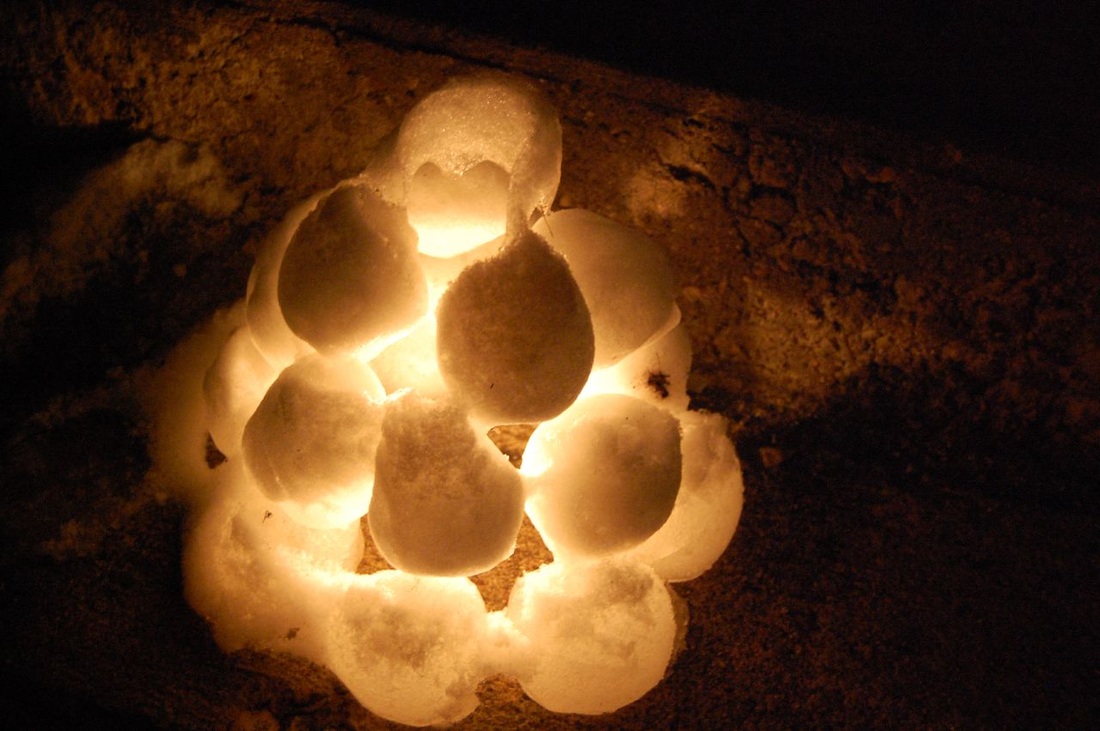 Snowball Lantern by Ellen MacDonald via Flickr I found this adorable snowball lantern today and thought I'd share it in honor of all the snow that continues to blanket the northeast. While it's not really a garden project, it is a great way to bring your yard and garden alive with light during cold winter nights.
Snowball lanterns are a traditional decoration during the winter holidays in Sweden. They can also be seen in Japan. In fact, the city of Hirosaki holds a special four-day celebration called the Hirosaki Castle Snow Lantern Festival. The festival is held around Valentine's Day each year and features snowball and other snow lanterns to a tune of 200 snow lanterns and 300 miniature igloos. If you'd like to try your hand at making snowball lanterns, get out the mittens and head on outside.
TIPS: Leave a gap on the back side of your snowball lantern so you can add the tea light. 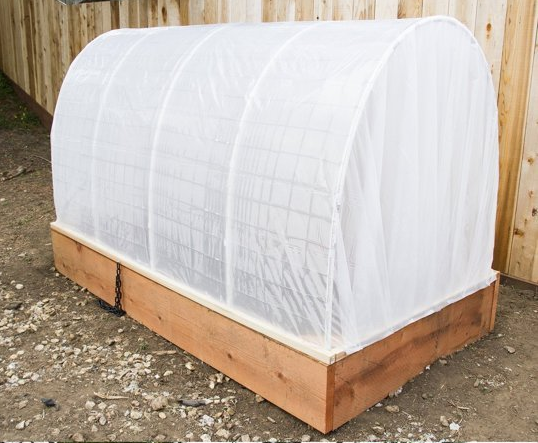 Raised Bed Greenhouse by Apartment Therapy If you are looking for ways to extend the garden season, this raised bed greenhouse may be your solution. I found this project on Apartment Therapy. You can find several plans for this online, but I especially like the addition of wire mesh to give this one stability. With the mesh, the greenhouse is less likely to suffer damage from winds or heavy rains.
The ribs are made from 1/2-inch PVC pipe (you can get them for under $1.50 each). If you already have raised beds, this project is inexpensive and easy-to-make. All you need is odds and ends of wood for braces, the PVC pipe and some pipe clamps. You will also need two hinges and some chain to allow you to open and close the greenhouse. I'm thinking about borrowing this design and covering mine with floating row cover so I can grow cabbage, broccoli and cauliflower without worries about cabbage worms. Row cover would also protect plants from late spring and early fall frosts. TIPS:
Until Next Time . . . HAPPY GARDENING! 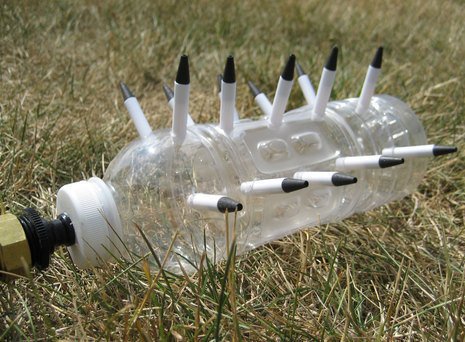 DIY Garden Sprinkler via Curbly I've seen a lot of DIY Garden Projects and I have to admit this one is pure genius.With a recylced 20-ounce soda bottle, 15 recycled pens, a hose attachment (cost: about $1.00) and some sealant you can make your own lawn sprinkler.
I'm thinking this handy sprinkler is ideal for watering hay or straw bale gardens, or for setting in the middle of the cucumber patch and watering away. You may even be able to entice hummingbirds who are known to enjoy flitting through a stream of fine mist. You can find the nitty gritty details for making this DIY garden sprinkler on Curbly. Until Next Time . . . HAPPY GARDENING! |