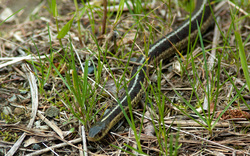
 I know it doesn't make a lot of sense that I am a gardener and I'm afraid of snakes. I know that they prey on garden pests and are actually good for my garden. I know there are no poisonous snakes in Maine. I even know these harmless little creatures deserve the good life as much as I do - but they can enjoy it somewhere else! I'm actually getting over my fear of snakes. I walked past a little green grass snake the other day and didn't do more than a hop and skip. I even smiled as it wiggled out of sight into the grass. And I ignored the garter snake that scurried out of my backyard a few weeks ago, thinking he was on his way to greener pastures. BUT . . . last night, I couldn't ignore the big old garter snake slithering through my raised bed. Luckily I knew right where my box of moth balls were. I know the experts tell us that moth balls are not designed for repelling snakes and that they pose a risk to pets and small children who may accidentally ingest them. Guess what folks? Snake-A-Way, an approved snake repellent often recommended by these same experts, carries the same warning but costs considerably more than a box of moth balls. I also know that the active ingredients in Snake-A-Way are naphalene and sulfur. If you've ever used Snake-A-Way (which works, by the way), you probably noticed that it smells just like ground up moth balls. There is a good reason for that. The active ingredient in moth balls is also naphalene. You can draw your own conclusions. I've used moth balls to repel snakes for the past few years, and unless they coincidentally slithered off at the same time - it works. How to Use Moth Balls for Snake Repellent
Use caution around children and small pets when using either moth balls or Snake -A-Way as they both pose a hazard if ingested.
0 Comments
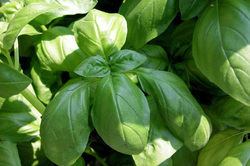 I picked up a couple of basil plants on clearance at Walmart yesterday. Although they are a bit scraggly, I couldn't resist the price tag of $1.00. With a good trim and a little care, these plants will produce enough basil for my needs all summer. There must have been a reason why I forgot to purchase basil earlier this year!
How to Prune Basil
Basil Flavored Oil I haven't decided how I'm going to use the cuttings from the plants yet. I'm thinking of steeping the leaves in extra virgin olive oil to make flavored oil for cooking - but when its made with fresh herbs, the oil must be refrigerated and used within a few days. Fresh herbs in oil can pose the risk of botulism if stored longer than a few days. For long-lasting oils, herbs must be dried thoroughly before adding them to oil. You can learn more about making herbed oils in my article How to Make Herbed Oils. Herbed Butter with Basil Another option, of course, is to make a simple herbed butter for use on french bread or to flavor pasta. This can be made from freshly chopped herbs - in this case basil - blended into softened butter or margarine. I like to add minced garlic, too, but that is up to you. Once the mixture is complete, it can be frozen safely for winter use. Freezing Fresh Basil Of course, I could simply chop the basil leaves and put them in ice cube trays filled with a little water. Once they are frozen, pop the cubes free of the tray and place them in a zip lock bag and keep them frozen. When you want the rich flavor of basil in your favorite recipe, simply drop a cube into the sauce and let it melt. Planting in the Rain It looks like I'll be planting in the rain today - but that's not necessarily a bad thing. My new basil plants will get the water they need to get them off to a good start and I'll get some fresh basil, as well. Luckily, I'll be tucking these plants into a raised bed and don't need to worry about compacting the soil from stepping in the garden. If you haven't planted basil yet, its not too late. This fast-growing herb will have plenty of time to mature in your garden this summer. Until Next Time . . . HAPPY GARDENING! 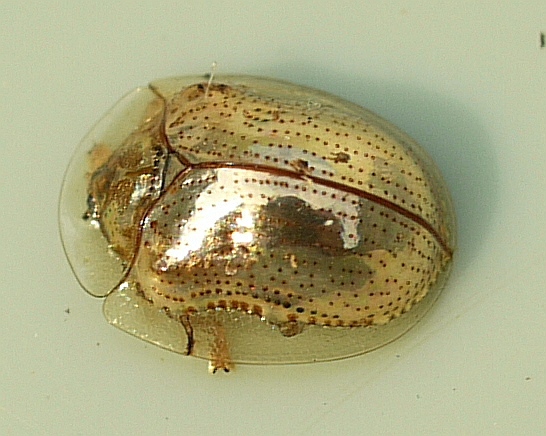 Ilona Loser - Creative Commons Ilona Loser - Creative Commons Late last night I noticed that my morning glory leaves had several round holes in them. A quick look revealed no insects, leaving me scratching my head - but it was late and I was too tired to investigate further.
This morning I decided to do a little investigating and discovered a golden beetle -shaped like a stink bug only much smaller - on the underside of a leaf. Glittering in the morning sun, he actually looked metallic. For a moment there, he had me wondering if I was in Eureka and being bombarded by some alien species. After the second cup of coffee, I shook the notion of alien invasions and went to work to discover exactly what this tiny creature was. It seems, that it a a golden tortoise beetle (Charidotella sexpunctata) that feeds on members of the Convolvulaceae family which includes morning glories, moon flowers, cardinal climbers and sweet potatoes. Not surprisingly this insect is often referred to as a "gold bug" and ranges from Florida north to Maine and west to about Texas and Iowa. According to the University of Florida Extension, damage is usually mild and does not typically require intervention. I'm not so sure I agree. Morning glory leaves that look like Swiss cheese aren't exactly my idea of beauty. For now, I will hand pick them and monitor damage closely - but if that doesn't do the trick I may need to resort to more proactive measures. Pyrethrin, a natural botanical insecticide made from the Chrysanthemum plant, is reportedly effective in controlling the golden tortoise beetle, as well as a number of other offending insects - including the Colorado Potato Beetle. Gurney's Seed offers an insect spray called Pyola that is made from Pyrethrin and Canola Oil. I'm thinking maybe its time to order a bottle. Until Next Time . . . HAPPY GARDENING! Note: Pyrethrin may pose a threat to some dogs and may cause death in cats. Always keep pesticides - even natural ones - out of the reach of children and pets and observe all safety precautions on the label.  Getting water to the roots of large plants such as tomatoes isn't always easy. Surface watering does little more than alleviate the immediate need for water. As we learned yesterday, this can actually cause your plants to develop roots close the surface of the soil, compromising the health of your plants. Using PVC pipe to direct water right to the roots is an inexpensive way to provide your tomatoes with the water they need to thrive. How to Make Vertical PVC Pipe Irrigation
The screen over the end of the pipe is not necessary, but does prevent small mammals, reptiles and amphibians from getting trapped in the pipe. As an alternative, leave the end open and water your tomato plants by inverting a bottle of water in the end of the pipe. Refill the bottle as needed to keep the roots of your tomatoes moist. Keeping the inverted bottle in the opening prevents debris or animals from entering it. Until Next Time . . . HAPPY GARDENING!  One of the most common mistakes made by new and experienced gardeners is failing to water their garden properly. We all fall victim to the thought that we can give it "a little drink" now and tend to it later. What many do not realize is that giving your garden frequent light waterings sets you and your garden up for failure. When gardens are watered lightly - wetting the soil at the surface - the roots of the plants grow upward toward the surface of the soil to get water. This causes the plant to develop a shallow root system. When drought threatens the roots cannot reach water and your plants quickly wilt and die - but that's not the only threat. Plant's roots provide water and nutrients to your plants, but they also provide support for the growing plant and fruit. Without that support system, your plants become weak and are easily damaged by wind and weather. To develop a strong root system your plants need to be watered deeply, so the water reaches the root zone. This encourages roots to form deep in the soil. When drought threatens, these healthy roots grow even deeper in search of water. So the next time you are tempted to give your garden a quick drink, consider the consequences. Light watering actually trains your plants to be dependent on you for relief as soon as the surface of the soil dries - but those that have been watered deeply send their roots downward where the soil typically remains cool and moist. Water your garden deeply once or twice a week - or whenever the soil feels dry one inch below the surface. Until Next Time . . . HAPPY GARDENING! Check back tomorrow for instructions on using PVC pipe for vertical irrigation. You are going to love this simple technique. If your house in anything like mine, you've probably noticed that your houseplants collect a fine layer of dust on the leaves dulling their appearance. Although wiping them down with a soft, damp cloth makes some improvement, I've discovered that it isn't always enough. To restore the natural shine of leaves, you need to go a step further. I use a dab of mayonnaise as a natural leaf shine and it works wonders - but you do need to use caution not to get the mayonnaise on the underside of the leaves as this will block the openings the plant uses to breathe.
I've been using mayonnaise for years on my houseplants and have never had an issue, however some have reported that is damaged their leaves. Although I suspect these reports are from people who mistakenly coated the undersides of the leaves with mayonnaise - I urge you to try this method out on a leaf or two before doing your whole plant. I find that mayonnaise works well to shine the leaves of waxy-leafed plants like philodendron and pothos, and even does a great job on my peace lily. 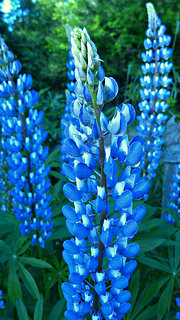 Photo by Emma Richford Photo by Emma Richford I planted my lupines from seed two years ago. Naturally, they didn't bloom the first year and only one plant survived the winter due to my own neglect. It produced several blooms the second year - but this year, it gave a spectacular show with over a dozen large beautiful spires. I am always disappointed when the blooms begin to fade, but this year I decided to be proactive and deadhead them as soon as the bottoms began to form seed pods. Last year I was reluctant to deadhead them until they became unsightly. I discovered that by removing the old seed pods from the bottom of the stem (after cutting them) that they made delightful cut flowers. I paired mine with daisies and roses. Although you do need to clean up the mess of fallen blooms as individual flowers drop each day, lupines last a week or more as a cut flower. A second set of blooms is coming along nicely. Several of the buds are already beginning to develop color and there are at least a dozen new blooms on the way. I don't expect them to create the dramatic display of the first flush of blooms - but they may surprise me. As an added bonus, I decided it was a waste to simply discard the seed pods and came up with a brilliant idea. I scattered them over the slope that leads to the little dirt road by my house in the hopes that at least some of them will eventually germinate there. If all works out, I just may have the traditional Maine lupine-covered hillside in a few years. If you haven't planted lupines, yet - there is still time to get them started for next year's bloom. If you are lucky, you may even enjoy a few blooms this fall. Russell’s Hybrids Mixed Lupines bloom in shades of traditional blue, pink and white - but also include striking red and yellow. Seeds can be purchased at Gurney's Seed. Until Next Time . . . HAPPY GARDENING! 
Many of us are reluctant to pinch back plants - but the truth is, it's one of the best things you can do for your plants. Pinching them back by removing the center leaves on growing tips forces new foliage to appear along them stem creating new branches. This technique creates dense compact foliage and healthy, robust plants. But it's not just for houseplants. Your flowering plants will respond in the same way and will produce more blooms.
How to Pinch Back Plants
I bit the bullet and pinched back my morning glories yesterday to encourage branching. Even though I know that it will produce healthier and fuller plants, it's always a hard decision - especially on plants that are growing well. So go ahead. Give your plants the pinch. You'll be glad you did. Until Next Time . . . HAPPY GARDENING! 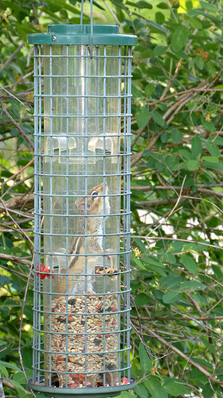 Photo by Emma Richford Squirrels and chipmunks seem to think bird feeders are your way of offering them a tasty treat - and can go to great lengths to get at your birdseed. This little chipmunk managed to remove the cover to my squirrel proof feeder and dive inside for a delicious treat of nuts and berries. Unfortunately, once inside, he wasn't able to escape (don't worry, after taking a few pictures we released him unharmed.)
If you, like me, enjoy all wildlife and wouldn't dream of harming squirrels and chipmunks - but want to keep them out of your bird feeders, there are some tricks to repelling squirrels you can try.
Home Remedies
Until Next Time . . . HAPPY GARDENING! For more information about keeping squirrels out of your bird feeders, visit How to Get Rid of Squirrels. 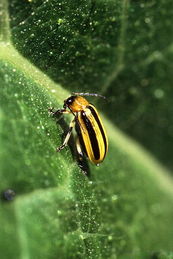 The striped cucumber beetle may seem harmless, but this mighty little bug chews holes in the leaves of cucumbers and squash leaving a buckshot appearance - but that's not their biggest risk. Striped cucumber beetles carry the bacteria Erwinia tracheiphila which is responsible for bacterial wilt. Once infected, your plants wilt and may die quickly. Controlling cucumber beetles protects your foliage from being eaten, but also protects your garden from bacterial wilt and other diseases that result from a cucumber beetle infestation. Traditional Remedies Chemical controls ~ Both carbaryl - sold as the brand name Sevin, and permethrin - sold as Ambush, are effective in controlling the striped cucumber beetle. However, these products do carry with them the added risk of injury to beneficial insects and pose a threat to pets and small children. Natural Remedies
Find cucumber beetles traps at Gardens Alive! Until Next Time . . . HAPPY GARDENING!
|